

Exposing personal services to the internet is one of the most exciting milestones of building a homelab. But the moment you open port 80 and 443, you realize you’ve invited the entire internet’s automated scan-bots, script kiddies, and brute-force tools to your doorstep.
If you look at your Traefik access logs, you will see a constant stream of bots probing for random /wp-login.php, /admin, or /config directories on services that don’t even run WordPress.
I started with basic auth and Authelia, which kept unauthorized users out but did nothing to stop bots from slamming my endpoints. They were still wasting bandwidth and probing for vulnerabilities. I wanted a way to block them at the proxy gateway before they even reached my services, and I wanted a notification on my phone whenever a ban occurred.
Here is how I set up CrowdSec and Traefik in Docker to handle this automatically.
Why CrowdSec?
Think of CrowdSec as a modern, crowd-sourced Fail2ban. Instead of working in isolation on a single server, it shares threat intelligence. If an IP behaves maliciously against another homelab on the network, CrowdSec adds it to a global blacklist. By the time that same IP attempts to scan your domain, it is already blocked.
It runs in two parts:
- The agent reads your service logs (like Traefik’s access logs) to spot suspicious behavior like directory scanning or brute forcing.
- The bouncer (a plugin inside Traefik) does the actual blocking.
The Architecture: How It Works
Here is a high-level look at how CrowdSec sits alongside Traefik in a Docker server setup:
[ Visitor Request ] ---> [ Traefik Proxy ] ---> [ Target App (e.g., Vaultwarden) ]
                              |
                     (Queries Bouncer Plugin)
                              v
[ CrowdSec LAPI ] <--- (Parses Traefik Logs via Log Volume)- A visitor requests a service (e.g.,
vaultwarden.yourdomain.com). - Traefik processes the request and sends the visitor’s IP address to the CrowdSec Bouncer middleware plugin.
- The plugin queries the CrowdSec Local API (LAPI) to check if the IP is banned.
- If banned, the request is instantly rejected (e.g.,
403 Forbidden). If clean, CrowdSec lets Traefik forward the request to the application. - Behind the scenes, the CrowdSec agent reads Traefik’s access logs to detect patterns like HTTP DDoS, path traversal, or authentication brute-forcing.
To put its efficacy into perspective: in one week alone, CrowdSec blocked over 920 automated attacks on my homelab, ranging from SSH brute-force attempts to HTTP path scans, without any manual intervention.

Docker Compose setup
I run my containers using individual compose files. Here is the configuration for CrowdSec, Traefik, and the Web UI.
CrowdSec Service (crowdsec.docker-compose.yml)
The CrowdSec agent needs access to the Traefik log directory to parse access logs in real-time.
services:
  crowdsec:
    container_name: crowdsec
    image: crowdsecurity/crowdsec:v1.7.8
    restart: always
    environment:
      TZ: ${TZ}
      # Load collections for Traefik, HTTP CVEs, SSH, and specific homelab applications
      COLLECTIONS: "crowdsecurity/traefik crowdsecurity/base-http-scenarios crowdsecurity/http-dos crowdsecurity/http-cve crowdsecurity/appsec-virtual-patching crowdsecurity/appsec-generic-rules crowdsecurity/linux crowdsecurity/sshd crowdsecurity/whitelist-good-actors LePresidente/authelia Dominic-Wagner/vaultwarden/ Jgigantino31/ntfy"
      GID: "${GID-1000}"
      TRUSTED_IPS: "127.0.0.1,::1,172.39.0.0/24,192.168.1.0/24"
    networks:
      - network-same-as-traefik
    volumes:
      # Read-only mount of Traefik's access logs
      - path/to/traefik/logs:/var/log/traefik:ro
      - crowdsec_data:/var/lib/crowdsec/data/
    healthcheck:
      test: ["CMD-SHELL", "wget --spider --quiet --tries=1 --timeout=5 http://localhost:8080/health > /dev/null 2>&1 || exit 1"]
      interval: 30s
      timeout: 10s
      retries: 3
      start_period: 30s

volumes:
  crowdsec_data:
    name: crowdsec_data
Traefik Service (traefik.docker-compose.yml)
Next, we run Traefik (v3.7.1 in my homelab). It depends on the CrowdSec container to ensure the security bouncer is up before routing requests.
services:
  traefik:
    image: traefik:v3.7.1
    container_name: traefik_proxy
    restart: unless-stopped
    depends_on:
      - crowdsec
    security_opt:
      - no-new-privileges:true
    networks:
      - traefik-network
    ports:
      - 80:80
      - 443:443
    environment:
      PUID: ${PUID}
      PGID: ${PGID}
      TZ: ${TZ}
    volumes:
      - "path/to/dynamic-config.yml:/etc/traefik/dynamic-config.yml:ro"
      - "path/to/traefik.yml:/etc/traefik/traefik.yml:ro"
      # Directory where Traefik writes access.log
      - "path/to/traefik/logs:/var/log/traefik"
Configuring the Traefik bouncer
We need a plugin to let Traefik talk to CrowdSec. We will use the crowdsec-bouncer-traefik-plugin for this. The configuration is split into static and dynamic files.
Static Configuration (traefik.yml)
First, we declare the plugin and load it under experimental.plugins:
experimental:
  plugins:
    crowdsec-bouncer-traefik-plugin:
      moduleName: "github.com/maxlerebourg/crowdsec-bouncer-traefik-plugin"
      version: "v1.4.4"
Next, under our main websecure entrypoint, we apply the CrowdSec bouncer middleware globally to all secure subdomains. This ensures that every single routed application receives CrowdSec protection by default:
entryPoints:
  websecure:
    address: ":443"
    http:
      middlewares:
        - "crowdsec-bouncer@file"  # CrowdSec checks happen first
        - "any-other-middlewarea@docker"        # Followed by anything else
Dynamic Configuration (dynamic-config.yml)
In the dynamic file provider (dynamic-config.yml), we configure the plugin settings. This includes activating CrowdSec’s AppSec (WAF) engine to intercept payload-based application attacks, and passing the local API key generated via cscli bouncers add:
http:
  middlewares:
    crowdsec-bouncer:
      plugin:
        crowdsec-bouncer-traefik-plugin:
          crowdsecAppsecEnabled: true
          crowdsecAppsecHost: crowdsec:7422
          crowdsecAppsecFailureBlock: true
          crowdsecAppsecUnreachableBlock: true
          enabled: true
Push notifications via Ntfy
A silent firewall is nice, but I want to know when someone is actively trying to break in. We can configure CrowdSec to send push alerts directly to a self-hosted Ntfy channel.
Step 1: Create a profile block in profiles.yaml
In /etc/crowdsec/profiles.yaml, we bind remediations to the ntfy plugin:
name: default_ip_remediation
filters:
 - Alert.Remediation == true && Alert.GetScope() == "Ip"
decisions:
 - type: ban
   duration: 4h
notifications:
  - ntfy
on_success: break
Step 2: Configure the notification HTTP plugin (ntfy.yaml)
Next, configure the HTTP options in /etc/crowdsec/notifications/ntfy.yaml. This formats the notification message and posts it directly to your Ntfy endpoint:
type: http
name: ntfy
log_level: trace
# The template parses the alert object and formats a clean text notification
format: |
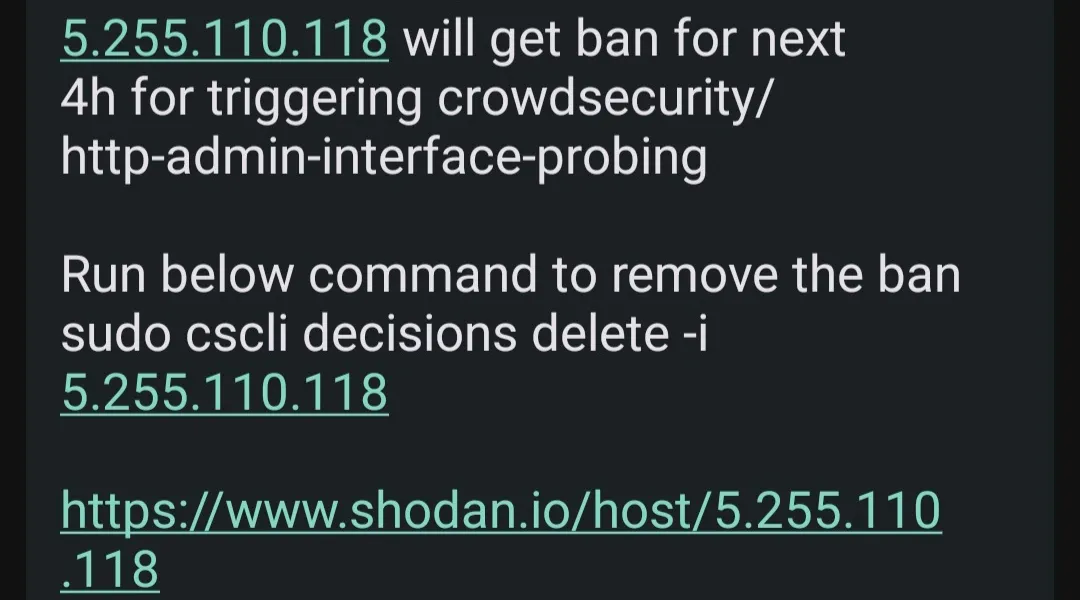
{{range . -}}{{$alert := . -}}{{range .Decisions -}}{{.Value}} will get {{.Type}} for next {{.Duration}} for triggering {{.Scenario}}
Run below command to remove the ban:
sudo cscli decisions delete -i {{.Value}}
Shodan Link: https://www.shodan.io/host/{{.Value}}
CTI Link: https://app.crowdsec.net/cti/{{.Value}}{{end -}}{{end -}}
url: http://your-ntfy-instance:80/channel-to-message-on
method: POST
headers:
Content-Type: "text/plain"
Title: "Crowdsec Trigger"
Tags: "warning"
Authorization: "Bearer your_ntfy_auth_token_here"Now, when a bot is banned, you will receive a push notification on your phone containing details about the scenario triggered, links to investigate the IP on Shodan or the CrowdSec CTI page, and even the exact cscli command to copy-paste to undo the ban if it was a false positive.
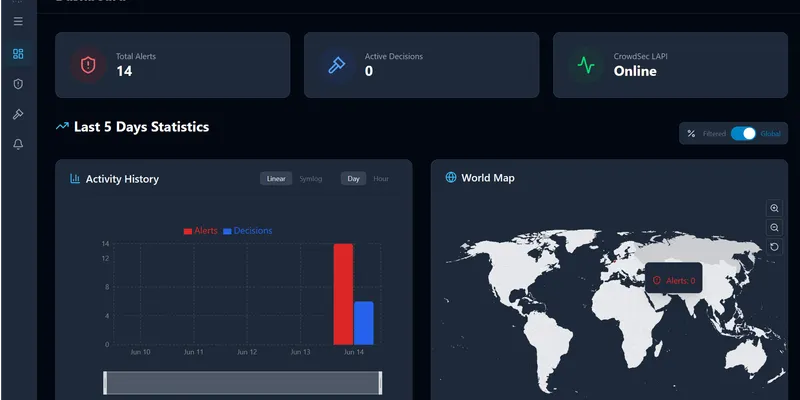
Monitoring with the CrowdSec Web UI
Managing bans via the terminal works fine, but a visual dashboard makes it much easier to spot trends.
I run the unofficial CrowdSec Web UI dashboard alongside my other compose files:
Web UI Compose (crowdsec-web-ui.docker-compose.yml)
services:
  crowdsec-web-ui:
    image: ghcr.io/theduffman85/crowdsec-web-ui:latest
    container_name: crowdsec_web_ui
    ports:
      - "3000:3000"
    environment:
      - CROWDSEC_URL=http://crowdsec:8080
      - CROWDSEC_USER=crowdsec-web-ui
      - CROWDSEC_PASSWORD=your_lapi_password_hash
      - CROWDSEC_LOOKBACK_PERIOD=5d
      - CROWDSEC_REFRESH_INTERVAL=30s
    volumes:
      - crowdsec_web_ui:/app/data
    restart: unless-stopped
    networks:
      - same-as-crowdsec
Using this dashboard, you can visually monitor which scanners are probing your domain and map where the traffic originates.
Testing the setup
To make sure everything works, you can simulate an attack from an outside connection (like your phone’s cellular data).
You can simulate a malicious probe using curl from an external network (e.g. your cellular data connection):
# Attempt to request a common generic vulnerability path on your domain
curl -I https://yourdomain.com/wp-admin/install.php
After running this a few times, check:
- The Bouncer Logs: You should receive a
403 Forbiddenresponse. - Ntfy Notifications: You should get a push notification detailing the IP ban.
- CrowdSec CLI: Run
docker exec crowdsec cscli decisions listto confirm your external IP appears in the active ban list.
To remove the ban and restore access, simply copy the command sent by your Ntfy notification:
docker exec crowdsec cscli decisions delete -i <your-banned-ip>Wrapping up
Integrating CrowdSec and Traefik takes the manual work out of securing exposed services. Instead of constantly reviewing logs and manually banning IPs, the system handles it automatically.
A few things I learned along the way:
- Pin your plugin and image versions. Breaking changes in minor version updates can bring down your reverse proxy.
- Double-check your whitelists. Make sure your local subnet range is under
TRUSTED_IPSso you do not accidentally ban yourself during testing. - Adjust your ban times. A 15-minute ban is fine for minor rate-limiting, but aggressive scanners should get at least 4 hours.
Frequently Asked Questions (FAQ)
What is the difference between Fail2ban and CrowdSec?
Fail2ban scans local log files and edits local firewall rules to block IPs on a single host. CrowdSec scans logs, handles blocks via API-driven bouncers (like Traefik middlewares), and shares metadata about attacks anonymously with a global network to proactively block attackers for other users.
Does the CrowdSec Traefik plugin impact site performance?
The CrowdSec Traefik plugin has a negligible performance impact. It caches IP decisions locally in memory, meaning that standard requests do not require a full network call to the local API for every request, resolving in sub-millisecond overhead.
How does CrowdSec AppSec work with Traefik?
CrowdSec AppSec acts as a Web Application Firewall (WAF). When enabled via the Traefik plugin (crowdsecAppsecEnabled: true), it inspects the request body and query strings for generic SQL injections, Cross-Site Scripting (XSS), or CVE exploits, blocking matching requests before they reach containers like Authelia or Vaultwarden.
How do I configure CrowdSec notifications for Ntfy?
To configure Ntfy, set up an HTTP notification profile in profiles.yaml pointing to a plugin name (e.g. ntfy). Then create /etc/crowdsec/notifications/ntfy.yaml containing the Ntfy channel URL, authorization header, and formatted alert template.